Device User Guide
Practical guide to setting up your QM laptop and best practises
Please read through all the below steps no matter how trivial they may seem.
Hardware installation
Monitor, dock/port replicator, keyboard & mouse
If you have been provided any of these items, for the most part you won’t go wrong by simply plugging them all in. All the connectors are designed to plug only into their relevant ports.
Do note: mains power is required for the monitor(s) and dock/port replicator.

For information on extending the picture across your screen(s) for multi-tasking purposes please see the relevant section below.
 Powering on laptop
- Open the laptop
- Press and hold down the power button for approx. 2 seconds (it’s located in the top right of the keyboard).
 Connecting to Wi-Fi
- At the logon screen click the wireless icon in the bottom right corner of the screen and join to your preferred wireless network.
- Then, at the top of the list make sure that ‘University Connection’ is displaying ‘Connected’ before proceeding to the next step.

 Logging in

Click ‘Other user’ then enter your Queen Mary user name (e.g. abc123) and password.
 Configuring extended display and dual monitors
Make sure your cables are connected properly to the new monitors, then press Windows logo key ( ) + P and click ‘Extend’.
If you need more help, here's what to do:
- Select Start > Settings > System > Display. Your PC should automatically detect your monitors and show your desktop. If you don't see the monitors, select Detect.
- In the ‘Multiple displays’ section, select an option from the list to determine how your desktop will display across your screens.
- Once you've made your changes, select ‘Keep changes’.

 Software - the following is pre-installed as standard:
Microsoft Word, Excel, PowerPoint, Outlook, Access & Publisher. Adobe Reader, Google Chrome, Mozilla Firefox, VLC Media Player, 7-Zip and others.
 Outlook setup (email)
- The shortcut for the Outlook email client can be found by clicking the Windows icon in the bottom left corner.
- Once launched follow through the steps by clicking ‘Next’ (note: your Queen Mary email address will appear automatically)
- When the process is complete you will see 3 green ticks and a congratulations message, click ‘Finish’. Outlook will then begin loading your profile.
 Teams (virtual meetings, text based chat, file sharing/storage)
Download and installation is required.
- Please start by Google searching for: teams download. The first result should have a microsoft.com address, this is the one we want. From there choose ‘Download for Desktop’.
- Open the file you have downloaded, a small window will appear with the Teams logo. Once the installation has completed you will be presented with a screen similar to this:

 Network drives - ‘G:’ & ‘J:’ (file storage/sharing)
‘G:’ is for storing personal files.
Files saved to your Desktop, Documents, Pictures, Videos & Music folders will reside on your laptop & with be synchronised with your G: drive when an internet connection is available.
‘J:’ is for storing departmentally shared files.
Files and folders here will only be accessible when you have an internet connection and ‘University Connection’ is displaying ‘Connected’ in the Wi-Fi networks list.
Both drives are accessible within programs/apps through: File > ‘Browse’ / ‘This PC’ 
or ‘File Explorer’ 
 How to log IT calls with online chat (24/7)
- Visit: its.qmul.ac.uk
- Click the orange ‘IT Live Chat’ button then complete and submit the quick form.
- A colleague will be with you will be momentarily.
 Best Practises
Do -
- reboot daily, at the end of the day. This will ensure antivirus and software updates are installed on your laptop.
- place your laptop on a hard, flat surface so air can flow under the laptop. If placed on soft surfaces e.g. Duvet, sofa, lap etc, ventilation holes may get blocked with the majority of heat reflected back.
- try to be as close as possible to your Wi-Fi router.
- store the laptop out of sight when not in use. Where possible, lock the laptop away.
- to help reduce eye-strain: take regular screen(s) breaks, wipe the screen clean and adjust the brightness (press Fn key + Up/Down arrow) to a lower setting.
Don’t -
- place your laptop in a hot environment e.g. in direct sun light or on a radiator.
- place your laptop on soft coverings that will retain heat. The laptop requires unrestricted air flow underneath it.
- keep food/drink near the laptop.
Broadband Service Providers
| Service Provider | What to Check | Contact Numbers | Web Links |
|---|---|---|---|
| BT Broadband |
|
0800 917 0510 |
https://my.bt.com/consumerFaultTracking/public/faults/tracking.do?pageId=31 |
| Virgin Media |
|
0345 454 1111 |
Check the current service with the customers Postcode Service Checker |
| Talk Talk |
|
0800 300 250 Monday – Friday 8am – 6pm |
Service Status Check will require a customer login. |
| Sky |
|
0333 7591 018 |
Sky Service Page will require customer login |
| EE |
|
08448 738 586 | https://ee.co.uk/help/contact-us |
Bitlocker
For security reasons laptops have BitLocker encryption.
- To enable Bitlocker you will prompted with the below message. Please click on Start.

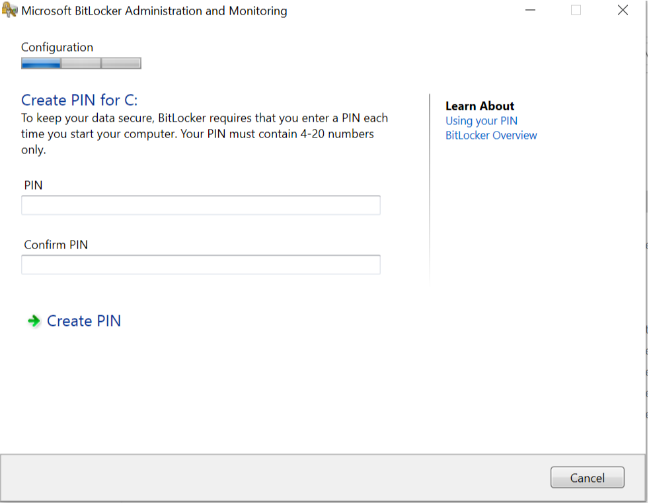
- Create a pin with a mimium of 4 digits and click on Create PIN.
(Please, make sure you remember your PIN).
- Once your restart the machine you will prompted for the Pin you setup in Step 2.
